Table of Contents
- Why Bother with DIY Healthy Snacks? More Than Just Food!
- Getting Started: Tips for DIY Snack Success
- Fruity Fun: Naturally Sweet & Simple Snacks
- Veggie Power: Crunch & Dip Delights
- Protein Punch: Snacks That Satisfy
- Wholesome Baked Goodies
- Handling Allergies & Dietary Needs
- Packing Tips for Freshness & Fun
- Conclusion: You’ve Got This, Lunchbox Hero!
Beyond the Bag: Awesome DIY Healthy Snacks for School Lunches Your Kids Will Actually Eat!
Ah, the school lunchbox. A daily puzzle for parents everywhere. You want something nutritious, something your kids will actually eat (and not trade for questionable playground currency), and something that doesn’t break the bank or require a culinary degree. Packed aisles promise convenience, but often deliver sugar bombs, mystery ingredients, and a hefty price tag. Feeling the pressure? You’re not alone!
But what if there was a way to pack delicious, exciting, and genuinely healthy snacks for school lunches without the stress? Enter the wonderful world of DIY! Making snacks at home puts you firmly in the driver’s seat. You control the ingredients, the portion sizes, and even the fun factor. It might sound daunting, but trust us, whipping up batches of wholesome goodies is easier (and more rewarding) than you think.
Forget sad, pre-packaged mediocrity. We’re talking vibrant fruit skewers, creamy homemade hummus, energy-boosting bites, and even sneaky veggie-packed muffins that taste like a treat. Get ready to transform that lunchbox from a source of parental anxiety into a treasure chest of tasty, nourishing fuel for your little learners. Let’s dive into the why and how of creating DIY healthy snacks that will make you a lunchbox legend!
Why Bother with DIY Healthy Snacks? More Than Just Food!
Okay, let’s be real. Grabbing a pre-packaged snack is undeniably quick. So why add another task to your already overflowing plate? The benefits of going DIY extend far beyond just avoiding a sugar crash.
Control Ingredients (Goodbye, Nasties!)
This is perhaps the biggest win. When you make snacks yourself, you know *exactly* what goes into them. No hidden sugars masquerading under fancy names (hello, high-fructose corn syrup!), no artificial colours or flavours, no excessive sodium, and no weird preservatives you can’t pronounce. You can choose whole grains, healthy fats, natural sweeteners (like fruit or a touch of maple syrup), and tailor everything to your child’s nutritional needs. This control is invaluable for providing sustained energy and supporting overall health – crucial for focus and learning at school.
Cost-Effective Crunch
Individually wrapped snacks add up quickly! Buying ingredients like oats, seeds, dried fruit, flour, and yogurt in larger quantities is almost always cheaper than purchasing their pre-made snack counterparts. A big batch of homemade granola bars or energy bites costs significantly less per serving than store-bought versions. Think long-term savings and better value for your money – plus, less packaging waste!
Allergy-Friendly Adventures
Navigating school snacks with allergies (nuts, gluten, dairy) can be a minefield. Many schools have strict allergy policies, particularly regarding nuts. Making snacks at home allows you to create safe, delicious options that meet specific dietary requirements without worry. Need nut-free school snacks? Easy! Gluten-free? Doable! Dairy-free? No problem! You can confidently pack snacks knowing they’re safe for your child and their classmates.
Fun Factor & Learning Opportunities
Getting kids involved in making their own snacks is a fantastic way to teach them about food, nutrition, and basic kitchen skills. Measuring ingredients (math!), following steps (reading!), and seeing the transformation from raw ingredients to tasty snacks (science!) are all valuable learning experiences. Plus, kids are often much more enthusiastic about eating something they helped create. It fosters a positive relationship with food and encourages adventurous eating.
Getting Started: Tips for DIY Snack Success
Ready to roll up your sleeves? Making homemade snacks doesn’t need to be complicated. Here are some practical tips to make it a smooth and sustainable part of your routine:
Plan Ahead (Meal Prep Magic)
Don’t try to whip up snacks from scratch every single morning – that’s a recipe for burnout! Dedicate an hour or two over the weekend or on a less busy evening to batch-prep snacks for the week ahead. Make a big batch of energy bites, bake a tray of muffins, chop veggies, or portion out yogurt and fruit. Store them in airtight containers in the fridge or freezer. This ‘grab-and-go’ approach makes weekday mornings much calmer.
Involve the Kids (Little Chefs = Happy Eaters)
As mentioned, get your children involved! Even young kids can help with simple tasks like washing fruit, stirring batter, pressing energy bites, or using cookie cutters. Older kids can measure ingredients, chop softer items (with supervision), and follow simple recipes. Make it a fun family activity. They’ll gain confidence and be more invested in their lunchbox contents.
Stock Your Pantry Wisely
Having healthy staples on hand makes impromptu snack-making much easier. Keep your pantry and fridge stocked with versatile ingredients:
- Pantry Staples: Rolled oats, whole wheat flour, almond flour, seeds (chia, flax, sunflower, pumpkin – check school nut policy!), dried fruit (dates, raisins, apricots – unsulfured if possible), nuts/nut butters (if allowed/for home), canned chickpeas, lentils, whole-grain crackers, popcorn kernels, cocoa powder, vanilla extract, cinnamon.
- Fridge/Freezer Staples: Plain yogurt (Greek or regular), eggs, cheese (block or shredded), fruits (berries, apples, bananas, oranges), vegetables (carrots, celery, cucumbers, bell peppers, sweet potatoes, zucchini), frozen fruits and vegetables.
Invest in Good Containers
Presentation matters, even in a lunchbox! Use reusable containers, silicone muffin liners, bento boxes with compartments, and small dip containers. This not only reduces waste but also keeps snacks separated, fresh, and visually appealing. Leaky containers or squished snacks are guaranteed to come home uneaten.

Fruity Fun: Naturally Sweet & Simple Snacks
Fruit is nature’s candy! It’s packed with vitamins, minerals, and fibre. Here are some easy ways to make fruit exciting for school lunches:
Rainbow Fruit Skewers
Visually appealing and fun to eat! Simply thread colourful fruit chunks onto small skewers (blunt-tipped ones are safer for younger kids).
- Ideas: Strawberries, melon cubes (cantaloupe, honeydew), grapes (halved for young children), kiwi slices, blueberries, pineapple chunks, orange segments.
- Tip: A small squeeze of lemon or lime juice can help prevent fruits like apples or bananas from browning. Serve with a small pot of yogurt dip (plain yogurt mixed with a touch of vanilla or cinnamon).
Homemade Apple Sauce (No Sugar Needed!)
Way healthier and tastier than store-bought versions often loaded with sugar.
- Peel, core, and chop 4-5 apples (use a mix like Gala and Granny Smith for balanced flavour).
- Place in a saucepan with about 1/4 cup of water and a cinnamon stick (optional).
- Simmer over medium-low heat, covered, for 15-20 minutes, or until apples are very soft. Stir occasionally.
- Remove the cinnamon stick. Mash with a fork for a chunky sauce or use an immersion blender for a smoother consistency.
- Let cool completely. Store in airtight containers in the fridge for up to a week.
Frozen Yogurt Fruit Bark
A cool and refreshing treat, perfect for warmer days (pack with an ice pack!).
- Line a baking sheet with parchment paper.
- Spread a layer of plain Greek yogurt (about 1/4-1/2 inch thick) evenly over the parchment paper.
- Sprinkle generously with chopped fruits (berries, kiwi, mango) and maybe some seeds or shredded coconut.
- Freeze for at least 2-3 hours, or until solid.
- Break into pieces and store in a freezer bag or container. Pack in an insulated lunch bag.
DIY Fruit Leather
A healthier alternative to sugary fruit roll-ups.
- Blend 2-3 cups of fruit (berries, mango, peaches, applesauce) until completely smooth. Add a squeeze of lemon juice. Sweeten only if necessary with a tiny bit of honey or maple syrup (optional).
- Line a baking sheet with parchment paper or a silicone mat.
- Pour the puree onto the prepared baking sheet and spread it very thinly and evenly (about 1/8 inch thick) using an offset spatula.
- Bake in the oven at the lowest possible temperature (usually 140-170°F or 60-75°C) for 4-8 hours, or until the center is no longer tacky. Prop the oven door open slightly to allow moisture to escape. Alternatively, use a food dehydrator.
- Let cool completely. Cut into strips (with the parchment paper still on if desired) and roll up.
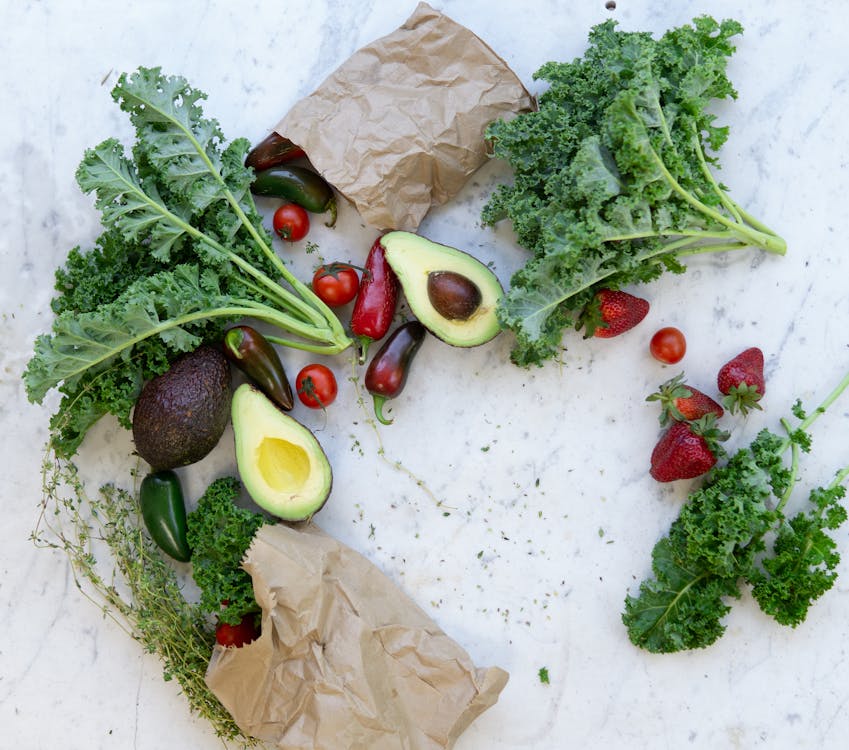
Veggie Power: Crunch & Dip Delights
Getting kids to eat veggies can be tough, but making them fun and dippable helps immensely! Think beyond boring carrot sticks.
Veggie Sticks & Dips Galore
The classic combo, but let’s upgrade it!
- Veggies: Carrot sticks, cucumber rounds/sticks, celery sticks, bell pepper strips (red, yellow, orange are sweetest), cherry tomatoes (halved), sugar snap peas, jicama sticks, steamed broccoli or cauliflower florets (cooled).
- Dips (Homemade is Best!):
- Hummus: Blend canned chickpeas (drained & rinsed), tahini, lemon juice, garlic, olive oil, and a little water until smooth.
- Guacamole: Mash ripe avocado with lime juice, finely chopped onion/cilantro (optional), and a pinch of salt. Pack immediately or add extra lime juice to prevent browning.
- Yogurt Ranch Dip: Mix plain Greek yogurt with dried dill, garlic powder, onion powder, parsley, and a pinch of salt and pepper. Thin with a little milk or water if needed.
- Bean Dip: Blend cooked white beans or black beans with salsa, cumin, and lime juice.
- Tip: Use small, leak-proof containers for dips to avoid messy lunchboxes.
Crispy Baked Veggie Chips
A much healthier alternative to greasy potato chips.
- Kale Chips: Wash and thoroughly dry kale leaves (curly kale works best). Remove tough stems. Tear leaves into bite-sized pieces. Toss with a tiny amount of olive oil and a pinch of salt. Spread in a single layer on a baking sheet. Bake at 300°F (150°C) for 10-15 minutes, until crispy but not burnt. Watch closely!
- Sweet Potato/Beet/Zucchini Chips: Thinly slice vegetables using a mandoline slicer (use caution!) or a sharp knife. Toss lightly with olive oil and desired seasonings (salt, pepper, paprika, garlic powder). Arrange in a single layer on baking sheets lined with parchment paper. Bake at 400°F (200°C) for 15-25 minutes, flipping halfway, until crispy and lightly browned. Let cool completely on a wire rack before storing.
Mini Veggie Muffins or Frittatas
Excellent way to pack protein and veggies together. Make a batch on Sunday!
- Sauté finely chopped veggies (onion, bell peppers, spinach, mushrooms, zucchini) until soft.
- Whisk eggs (about 6-8 for a 12-cup muffin tin) with a splash of milk (optional), salt, pepper, and maybe some grated cheese.
- Grease a mini muffin tin well. Divide the cooked veggies among the cups.
- Pour the egg mixture over the veggies.
- Bake at 375°F (190°C) for 15-20 minutes, or until set and lightly golden.
- Let cool before removing from the tin. Store in the fridge. Great served cold or at room temperature.
Edamame Power Pods
Steamed edamame (soybeans) in their pods are fun to pop open and eat. They’re packed with protein and fibre. Buy them frozen, steam or boil according to package directions, let cool, and sprinkle lightly with sea salt. Simple, yet satisfying!
Protein Punch: Snacks That Satisfy
Protein helps keep kids full and focused throughout the school day. These snacks provide staying power:
Power-Packed Energy Bites (No-Bake!)
These are endlessly customizable and super easy to make. A true homemade lunchbox idea staple!
- Base Formula: 1 cup rolled oats + 1/2 cup seed butter (sunflower seed butter for nut-free) or nut butter (if allowed) + 1/3 cup sticky binder (honey, maple syrup, or mashed dates) + mix-ins.
- Mix-in Ideas: Chia seeds, ground flaxseed, hemp seeds, shredded coconut, mini chocolate chips (dark), dried cranberries or raisins, vanilla extract, cinnamon.
- Instructions: Combine all ingredients in a bowl. Mix well. If too sticky, add more oats; if too dry, add a bit more binder or a splash of water/milk. Chill the mixture for 15-30 minutes. Roll into small balls. Store in an airtight container in the fridge.

Roasted Chickpeas (Savory Snack Attack)
Crunchy, savory, and full of fibre and protein.
- Drain and rinse one can of chickpeas thoroughly. Pat them completely dry with paper towels (this is key for crispiness!).
- Toss the dry chickpeas with 1-2 tablespoons of olive oil and your favorite seasonings (e.g., salt, pepper, garlic powder, paprika, cumin, chili powder, dried rosemary).
- Spread in a single layer on a baking sheet.
- Roast at 400°F (200°C) for 20-30 minutes, shaking the pan occasionally, until golden brown and crispy.
- Let cool completely on the baking sheet before storing in an airtight container. They are best eaten the same day for maximum crunch but will keep for a few days.
Hard-Boiled Eggs (The Simple Superstar)
Don’t underestimate the power of a humble hard-boiled egg! It’s a portable protein powerhouse.
- Perfect Peel Tip: Steam eggs instead of boiling, or add a splash of vinegar to the boiling water. Plunge cooked eggs immediately into an ice bath.
- Make it Fun: Use fun egg molds or draw silly faces on the shells (with non-toxic markers) before packing. Pack peeled or unpeeled, depending on your child’s preference and ability.
Cheese & Whole-Grain Crackers (Classic Combo)
A simple, satisfying snack. Choose real cheese (cubes, slices, or sticks) over processed cheese products. Pair with 100% whole-grain crackers for added fibre. Look for crackers with minimal ingredients and low sodium.
Wholesome Baked Goodies
Baking doesn’t have to mean sugar overload. You can make delicious and nutritious baked snacks perfect for lunchboxes.
Healthy Oatmeal Cookies
Look for recipes that use oats as the primary flour, natural sweeteners like mashed banana or applesauce, and minimal added sugar. Include add-ins like raisins, seeds, or chopped dried fruit. Many recipes online cater specifically to healthy baking for kids.
Banana Oat Muffins (Low Sugar)
Use ripe bananas for natural sweetness, reducing the need for added sugar. Incorporate whole wheat flour or oat flour, and consider adding flaxseed or chia seeds for an extra boost. Mini muffins are perfectly portioned for lunchboxes.
Zucchini Bread/Muffins (Hidden Veggies!)
Shredded zucchini adds moisture and nutrients to baked goods without altering the flavour significantly, especially when paired with ingredients like cinnamon or cocoa powder. A great way to sneak in some extra greens! Again, look for recipes lower in sugar.
Whole Wheat Mini Pizzas
Use whole wheat pita bread, English muffins, or even homemade dough as the base. Top with tomato sauce (low sugar), shredded mozzarella cheese, and finely chopped veggies (bell peppers, mushrooms, olives) or leftover cooked chicken. Bake until bubbly and golden. These are great cold or reheated (if your child has access to a microwave).

Handling Allergies & Dietary Needs
Creating safe and inclusive snacks is crucial, especially in school settings.
Nut-Free Snack Ideas
Many schools are entirely nut-free zones. Always double-check your school’s policy.
- Use sunflower seed butter (SunButter) or pumpkin seed butter instead of peanut or almond butter in recipes like energy bites.
- Focus on seeds like chia, flax, hemp, sunflower, and pumpkin seeds (check if seeds are allowed).
- Snacks like roasted chickpeas, veggie sticks with hummus (ensure tahini is allowed or make tahini-free), fruit skewers, yogurt, cheese sticks, hard-boiled eggs, and most baked goods made without nuts are generally safe bets.
- Always read labels on packaged ingredients (like chocolate chips or crackers) to check for cross-contamination warnings.
Gluten-Free Swaps
If your child needs gluten-free options:
- Use certified gluten-free rolled oats for energy bites and baking.
- Opt for gluten-free flour blends (like almond flour, coconut flour, or commercial GF blends) in muffins and cookies.
- Choose gluten-free crackers.
- Naturally gluten-free snacks include fruits, vegetables, dips like hummus and guacamole, hard-boiled eggs, cheese, yogurt, roasted chickpeas, and edamame.
Dairy-Free Delights
For dairy-free needs:
- Use plant-based yogurts (coconut, almond, soy) for dips and yogurt bark.
- Substitute plant-based milk (almond, soy, oat) in baking and smoothies.
- Use nutritional yeast for a cheesy flavour in savory recipes or opt for dairy-free cheese alternatives.
- Focus on naturally dairy-free options like fruits, veggies, hummus, guacamole, energy bites made with water or plant milk, hard-boiled eggs, and roasted chickpeas.
Packing Tips for Freshness & Fun
How you pack the snacks is almost as important as the snacks themselves!
- Keep it Cool: Use an insulated lunch bag and a slim ice pack, especially for dairy, eggs, meats, and some cut fruits/veggies or items like yogurt bark.
- Prevent Soggy Snacks: Pack crackers separately from moist items like dips or juicy fruits. Use containers with compartments or separate small containers.
- Easy Open: Ensure containers are easy for little hands to open independently. Practice at home if needed.
- Portion Control: Pack appropriate portion sizes for your child’s age and appetite. Too much can be overwhelming.
- Add a Note: A little handwritten note or a fun sticker can make lunchtime feel extra special.
- Variety is Key: Rotate snacks throughout the week to keep things interesting and ensure a wider range of nutrients.
Conclusion: You’ve Got This, Lunchbox Hero!
Packing healthy school snacks doesn’t have to be a chore or a compromise. By embracing a little DIY spirit, you unlock a world of nutritious, delicious, and affordable options that fuel your child’s body and mind for a successful school day.
Remember, it’s not about achieving Pinterest-perfect lunchboxes every single day. It’s about making small, sustainable changes. Start with one or two simple homemade snacks a week. Involve your kids, plan ahead, and celebrate the victories – like an empty lunchbox coming home!
You have the power to ditch the processed packets and pack lunches filled with real food, love, and goodness. These DIY healthy snacks for school lunches are just the beginning. Experiment, find your family’s favourites, and enjoy the peace of mind that comes with knowing exactly what your child is eating. Happy snacking!