Table of Contents
- What Exactly IS a Sensory Bin?
- Why are Sensory Bins SO Amazing for Toddler Development?
- Getting Started: Your DIY Sensory Bin Toolkit
- Safety First! Essential Sensory Bin Rules
- Inspiring DIY Sensory Bin Ideas for Endless Fun
- Making the Most of Sensory Play: Tips for Engagement
- The Takeaway: Simple Bins, Profound Impact
Unlock Your Toddler’s Potential: The Ultimate Guide to DIY Sensory Bins for Development
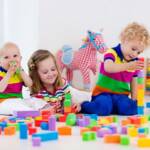
Remember those moments watching your toddler utterly captivated by the simplest things? The texture of sand slipping through their fingers, the crinkle of wrapping paper, the splash of water? That innate curiosity is the foundation of learning, and you, dear parent or caregiver, hold the key to unlocking a world of discovery right in your own home. How? Through the magic of DIY sensory bins!
Forget expensive, flashing plastic toys for a moment. We’re diving deep into the wonderfully messy, incredibly engaging, and developmentally crucial world of sensory play. If you’re looking for a fun, affordable, and powerfully effective way to boost your toddler’s development, you’ve come to the right place. Get ready to explore how a simple container filled with carefully chosen materials can become a powerhouse for learning, sparking joy and growth in your little one.
What Exactly IS a Sensory Bin?
At its core, a sensory bin (or sensory tub) is simply a container filled with tactile materials designed to stimulate a child’s senses. Think of it as a miniature world of exploration contained within boundaries. It’s a hands-on play invitation that encourages children, especially toddlers and preschoolers, to explore, discover, imagine, create, and learn through touching, scooping, pouring, smelling, and sometimes even tasting (with safe materials, of course!).
The beauty lies in its versatility. A sensory bin can be as simple as a plastic tub filled with dry rice and measuring cups, or as elaborate as a themed underwater world with blue water beads, sea creatures, and shells. The possibilities are truly endless, limited only by your imagination and, importantly, safety considerations.
Why are Sensory Bins SO Amazing for Toddler Development?
Okay, so they’re fun. But the benefits of sensory play via these bins go far beyond simple entertainment. They are fundamental tools for supporting holistic toddler development across multiple domains. Let’s break down the magic:

Boosting Cognitive Development
Sensory bins are like little laboratories for young minds. As toddlers manipulate materials, they’re naturally engaging in scientific thinking and mathematical concepts:
- Problem-Solving: How can I get the rice into this tiny bottle? How can I balance these blocks on the beans? They experiment and find solutions.
- Cause and Effect: If I pour water from high up, it splashes! If I push the car through the oats, it leaves a track.
- Sorting and Classifying: Finding all the red pom-poms, separating big beans from small beans, grouping animals.
- Measurement & Volume Concepts: Discovering that it takes many scoops from a small cup to fill a bigger cup.
- Object Permanence: Hiding objects under the filler and finding them again reinforces the concept that things exist even when unseen.
This hands-on exploration makes abstract concepts tangible and understandable for a toddler’s developing brain, laying crucial groundwork for future academic learning. It’s powerful learning through play.
Sharpening Fine Motor Skills
The small, precise movements required to interact with sensory bin materials are fantastic for developing fine motor skills and hand-eye coordination. Every scoop, grasp, pinch, and pour strengthens the small muscles in their hands and fingers, which are essential for tasks like:
- Holding a pencil or crayon
- Buttoning clothes and using zippers
- Using utensils
- Cutting with scissors
Think about actions like picking up individual beans or grains of rice (pincer grasp), scooping and pouring fillers, using tongs to transfer pom-poms, or manipulating small toys within the bin. It’s a fun-filled workout for those little digits!
Encouraging Language Development
Sensory bins are conversation starters! As your toddler explores, you have countless opportunities to introduce new vocabulary and encourage communication:
- Descriptive Words: Talk about textures (smooth, rough, bumpy, soft, squishy), sizes (big, small, tiny), shapes, and colours. Use words like scoop, pour, sprinkle, dig, hide, find.
- Positional Language: Introduce concepts like in, out, on, under, next to, behind. “The blue car is *under* the rice!”
- Questioning: Ask open-ended questions like “What does that feel like?” or “What happens if you…?” or “Can you find the…?”
- Storytelling: Create simple narratives around the bin’s theme. “The farmer is feeding the pigs with the corn!”
- Turn-Taking: If playing alongside them or with another child, it encourages sharing tools and taking turns talking about discoveries.
This rich language environment significantly boosts vocabulary acquisition and comprehension skills.
Supporting Sensory Exploration & Regulation
This is the heart of sensory bins! They provide controlled exposure to various sensory inputs – tactile, visual, auditory (the sound of pouring rice), and sometimes olfactory (scented playdough or spices). This exploration helps children understand their senses and how their body processes information.
Furthermore, sensory play can be incredibly calming and regulating for many toddlers. The repetitive actions of scooping, pouring, or running hands through materials like rice or water beads can soothe an anxious or overstimulated child. It provides a focused activity that can help them de-stress and manage big emotions. For children who are sensory seekers, bins provide appropriate input they crave; for those sensitive to textures, it offers a safe way to explore them gradually.
Fostering Problem-Solving & Creativity
Sensory bins are open-ended invitations to play. There’s no ‘right’ way to do it. This freedom encourages:
- Imagination: A bin of blue water beads becomes the ocean; a bin of oats becomes a construction site or a farm field.
- Creativity: Toddlers invent their own games, scenarios, and ways to use the tools provided.
- Experimentation: They test hypotheses – will this float? Can I build a tower? What happens if I mix these?
This unstructured play is vital for developing flexible thinking and creative problem-solving abilities.
:max_bytes(150000):strip_icc()/VWF-DIY-Sensory-Table-for-Kids-heather-clare-creative-01-d64d1e73506c46f9bc0c7b19a4d2e8e3.jpg)
Getting Started: Your DIY Sensory Bin Toolkit
Ready to create your own sensory magic? It’s easier than you think! Here’s what you’ll need:
Choosing the Right Bin
The ‘bin’ itself is the foundation. Look for something:
- Size Appropriate: Large enough for exploration but not so huge it’s overwhelming or uses excessive filler. For toddlers, shallow under-bed storage containers (around 15-30 quarts) often work well. Clear bins allow viewing from the sides.
- Sturdy: It needs to withstand enthusiastic play!
- Accessible: Ensure your toddler can comfortably reach inside while sitting or standing.
- With a Lid (Optional but Recommended): A lid makes storage easy and keeps fillers contained between play sessions.
Common choices include plastic storage totes, dishpans, large baking pans (for smaller, focused activities), or even inflatable pools for large-scale outdoor sensory fun.
Sensory Bin Fillers: The Fun Part!
The ‘filler’ or ‘base’ is the main sensory material. Choose based on your toddler’s age, interests, and safety considerations (especially regarding mouthing). Variety is key!
Dry Bases (Non-Edible):
- Dyed or plain rice
- Dried beans or lentils (use larger ones like kidney beans for younger toddlers to reduce choking risk, always supervise)
- Dried pasta shapes
- Oats (rolled or quick)
- Cornmeal
- Birdseed
- Sand (play sand or kinetic sand)
- Pom-poms
- Shredded paper
- Cotton balls
- Aquarium gravel (ensure it’s non-toxic)
- Buttons (for older toddlers with close supervision)
- Split Peas
Dry Bases (Edible/Taste-Safe – great for younger toddlers who still mouth things):
- Puffed rice or corn cereal (Cheerios, Corn Pops, Rice Krispies)
- Cooked and cooled pasta (can be dyed)
- Tapioca pearls (cooked and cooled)
- Jell-O (prepared, jiggly fun!)
- Whipped cream or cool whip (messy but delightful!)
- Edible ‘sand’ (blended Cheerios or graham crackers)
Wet Bases:
- Water (plain, coloured with food colouring, or bubbly with tear-free soap)
- Water beads (use with strict supervision, ensure they are non-toxic, and not for children who still mouth objects extensively)
- Shaving cream (use taste-safe alternatives like whipped cream for mouthers)
- Mud (outdoor fun!)
- Cooked spaghetti ‘worms’
Essential Tools & Toys
These enhance the play and fine motor practice:
- Scoops (various sizes)
- Measuring cups and spoons
- Funnels
- Tongs or tweezers (kid-safe ones)
- Small bowls or containers
- Small toys related to a theme (animals, vehicles, letters, numbers, pretend food)
- Natural elements (smooth stones, shells, leaves, twigs – ensure they are clean and safe)
- Silicone cupcake liners
- Whisky or spatulas
- Empty spice jars or small bottles with lids for pouring into
Safety First! Essential Sensory Bin Rules
While sensory bins are fantastic, safety is paramount. Always keep these guidelines in mind:

Supervision is Key
Never leave a toddler unattended with a sensory bin, especially with small parts or wet bases. Active supervision allows you to monitor for safety, redirect potentially unsafe actions, and engage with your child.
Mind the Choking Hazards
Be extremely cautious with small fillers (like small beans, beads, buttons, water beads) if your toddler still mouths objects. The general rule is if it can fit through a toilet paper tube, it could be a choking hazard for young children. Opt for larger fillers or taste-safe options for this stage.
Consider Allergies & Sensitivities
Be aware of any food allergies (e.g., wheat in pasta/cereal, nuts) or skin sensitivities when choosing fillers. If using food items, ensure they are safe for your child. Some children may react to certain scents or textures.
Taste-Safe vs. Non-Edible
Clearly understand the difference. If your child is likely to taste the contents, stick strictly to taste-safe edible bases. Even with taste-safe bins, encourage playing, not eating. For non-edible bins, establish a clear rule: “This is for playing with our hands, not for eating.”
Maintain Cleanliness
Store dry fillers in airtight containers to keep them clean and free from pests. Wet bases like water should be changed frequently. Wash hands before and after play. Regularly clean the bin and tools. Discard edible fillers after play or if they become contaminated.
Inspiring DIY Sensory Bin Ideas for Endless Fun
Need some inspiration to get started? Here are a few themed ideas adaptable for various fillers:
1. The Classic Rice Bin
- Filler: Plain or dyed rice (use food colouring or liquid watercolours).
- Tools: Scoops, cups, funnels, small bowls.
- Add-ins: Small toys, alphabet letters, pom-poms, buttons (supervised).
- Skills: Pouring, scooping, fine motor, colour/letter recognition (optional).
2. Construction Zone Dig
- Filler: Dried black beans, split peas, cornmeal, or oats.
- Tools: Toy construction vehicles (diggers, dump trucks), scoops, rocks (smooth), small blocks.
- Skills: Imaginative play, scooping, pouring, loading/unloading.
3. Ocean Adventure
- Filler: Water (coloured blue), water beads (supervised!), or blue-dyed rice/pasta.
- Tools: Sea creature toys, shells, scoops, small nets, boats.
- Skills: Imaginative play, scooping, pouring, exploring sinking/floating.
4. Farm Fun
- Filler: Oats, cornmeal, birdseed, or split peas.
- Tools: Farm animal figures, small toy tractor, scoops, small pails, faux grass or hay.
- Skills: Imaginative play, animal recognition, scooping, pouring.

5. Nature Explorers
- Filler: Dried leaves, twigs, acorns, smooth stones, soil (clean play dirt), wood chips (collected from a safe source or purchased).
- Tools: Magnifying glass, small pots, scoops, insect toys, natural loose parts.
- Skills: Nature exploration, texture discovery, sorting, fine motor.
6. Rainbow Pasta/Rice
- Filler: Dried pasta or rice dyed in vibrant rainbow colours.
- Tools: Scoops, bowls (coloured to match), tongs, small colourful toys.
- Skills: Colour recognition, sorting, scooping, fine motor.
7. Water Play Wonders
- Filler: Plain water, bubbly water, or coloured water.
- Tools: Cups, funnels, sponges, droppers/basters, floating toys, strainers.
- Skills: Pouring, squeezing, exploring volume, cause and effect (splashing!). Best done outdoors or on a protective mat.
8. Edible Delights (Taste-Safe)
- Filler: Cooked (and cooled) spaghetti, Jell-O, Cheerios, or blended graham crackers (‘sand’).
- Tools: Spoons, cups, blunt kid-safe plastic cutlery, small edible-safe toys.
- Skills: Safe sensory exploration for mouthers, scooping, imaginative play (e.g., making ‘cakes’ with graham cracker sand).
Making the Most of Sensory Play: Tips for Engagement
Creating the bin is just the start. How you facilitate the play can significantly enhance the learning experience:
Follow Your Toddler’s Lead
Observe what captures their interest. Don’t impose your own agenda too strongly. If they’re fascinated by simply pouring rice back and forth for 20 minutes, that’s okay! They are learning and concentrating.
Ask Open-Ended Questions
Instead of asking “Is that blue?” (which has a yes/no answer), try “Tell me about what you are doing” or “I wonder what will happen if you pour the water into the funnel?” This encourages thinking and language.
Rotate Themes and Fillers
Keep things fresh! Introduce new themes, fillers, or tools periodically to maintain interest and expose your toddler to different sensory experiences and concepts. You don’t need a new bin every day, but rotating every week or two can be beneficial.
Incorporate Learning Naturally
Hide letters in the rice and have them find the letters in their name. Count the scoops it takes to fill a cup. Sort objects by colour or size. Integrate these concepts playfully, not forcefully.
Don’t Stress the Mess!
Okay, this is a big one. Sensory play *can* be messy. Accept it as part of the process. Here are tips to manage:
- Lay down an old sheet, shower curtain, or plastic tablecloth under the bin.
- Take messy play (like water or sand) outdoors if possible.
- Set clear boundaries: “The rice stays in the bin.” (Redirect gently when it spills).
- Have cleanup tools handy (dustpan and brush, cloths).
- Involve your toddler in the cleanup process – it’s another learning opportunity!
Remember, the developmental benefits far outweigh the temporary mess.
The Takeaway: Simple Bins, Profound Impact
DIY sensory bins are far more than just a way to keep your toddler busy. They are dynamic, adaptable, and incredibly effective tools for fostering critical aspects of early childhood development. From refining fine motor skills and boosting cognitive growth to encouraging language acquisition and providing essential sensory input, the benefits are vast.
The best part? They are accessible and affordable. You don’t need fancy equipment – a simple storage tub and some basic household staples can open up a universe of learning through play. By embracing a little bit of mess and a whole lot of exploration, you’re giving your toddler invaluable opportunities to learn, grow, and develop foundational skills that will serve them for years to come.
So, gather your bin, choose your filler, and let the sensory adventures begin! Watch your toddler’s eyes light up with curiosity and know that you’re nurturing their development in one of the most joyful ways possible.